Finalizing Stream Configuration
Configuring Stream default templates
If you intend to use Stream as your certification authority, default templates should be created.
As Stream is template-oriented, default templates will be used when enrolling certificates.
Two templates are considered as defaults:
-
A
tlsClienttemplate for TLS client certificates -
A
tlsServertemplate for TLS server certificates
To create these templates:
Connect to the server with an account with administrative privileges;
Start the Stream configuration utility by running:
# /opt/stream/sbin/stream-configIn the main menu, select 'Stream':

In the Stream menu, select 'STREAM_DEFAULT_TEMPLATE':

The templates are automatically created and available in .
mongosh must be installed and the mongo URI configured for this configuration to work
|
Installing a Server Authentication Certificate
Issuing a Certificate Request (PKCS#10)
Connect to the server with an account with administrative privileges;
Start the Stream configuration utility by running:
# /opt/stream/sbin/stream-configIn the main menu, select 'NGINX':

In the NGINX menu, select 'CSR':

Specify the DNS Name of the Stream server (the same that you used as Stream hostname previously):

The certificate request is generated and available under '/etc/nginx/ssl/stream.csr.new':

Signing the certificate
The CSR generated at the previous steps must then be signed using an existing PKI. If you do not have an existing PKI, please refer to the Key Ceremony Documentation to create one.
Sign using Stream
| This step assumes that the Key Ceremony already happened, i.e the operational CAs are imported into Stream as managed CAs. |
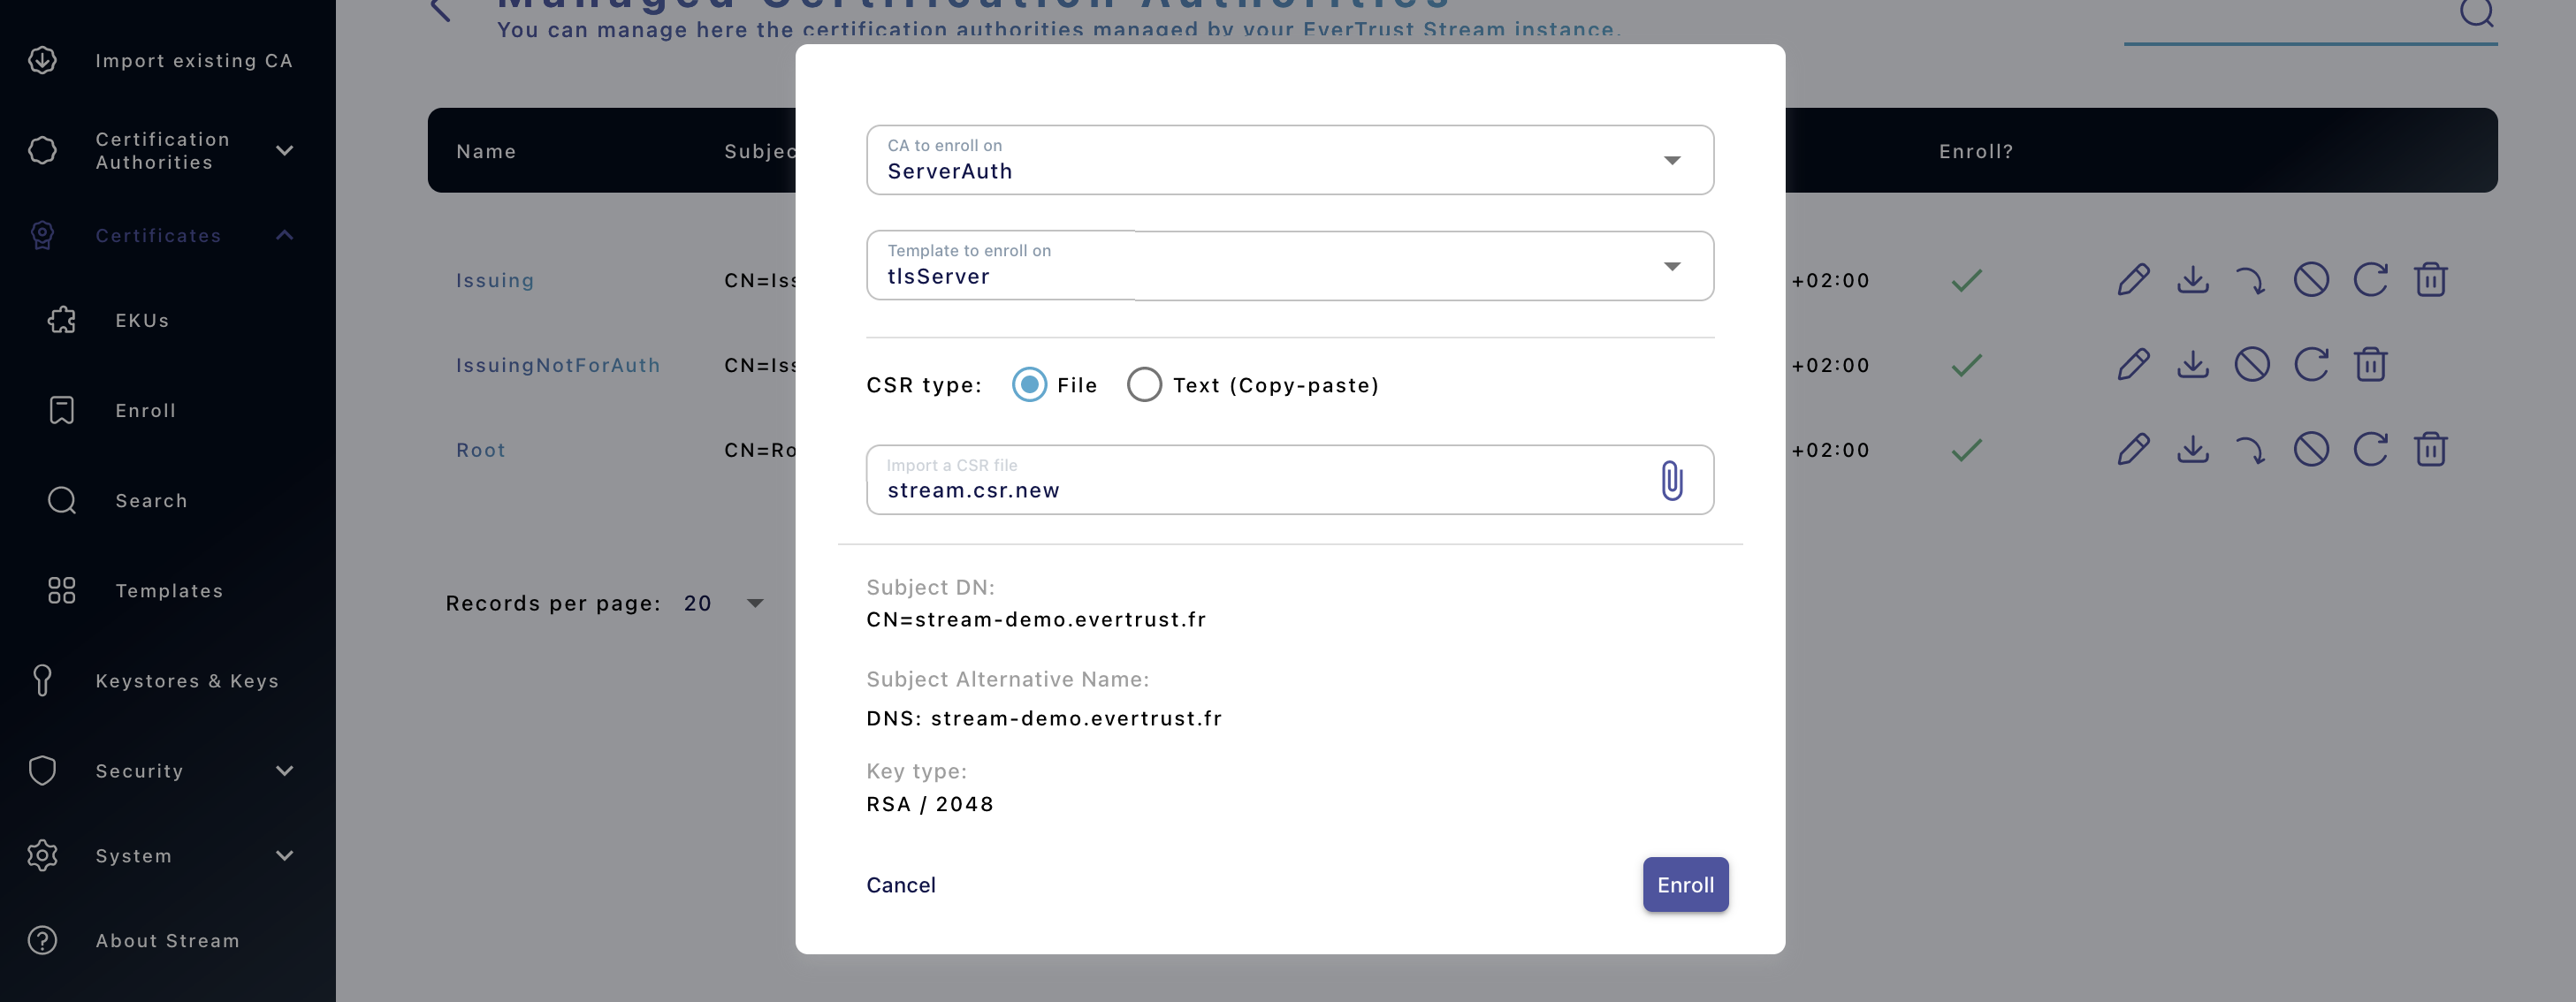
1. Access Stream’s web administration console and log in using the default administration credentials that were obtained at this section;
2. Browse to 'Certificates > Enroll';
3. Fill in the following information:
-
CA to enroll on: Select the CA that is issuing the server certificates for your organization;
-
Template to enroll on: Select the certificate template that was created at this step that should be named 'tlsServer';
-
CSR type: Select 'File', then click the paper clip icon and import the CSR that was generated at this step;
Then click 'Enroll':
You can retrieve the enrolled certificate in PEM format from the 'Certificates > Search' : download this certificate in PEM
Installing the Server Certificate
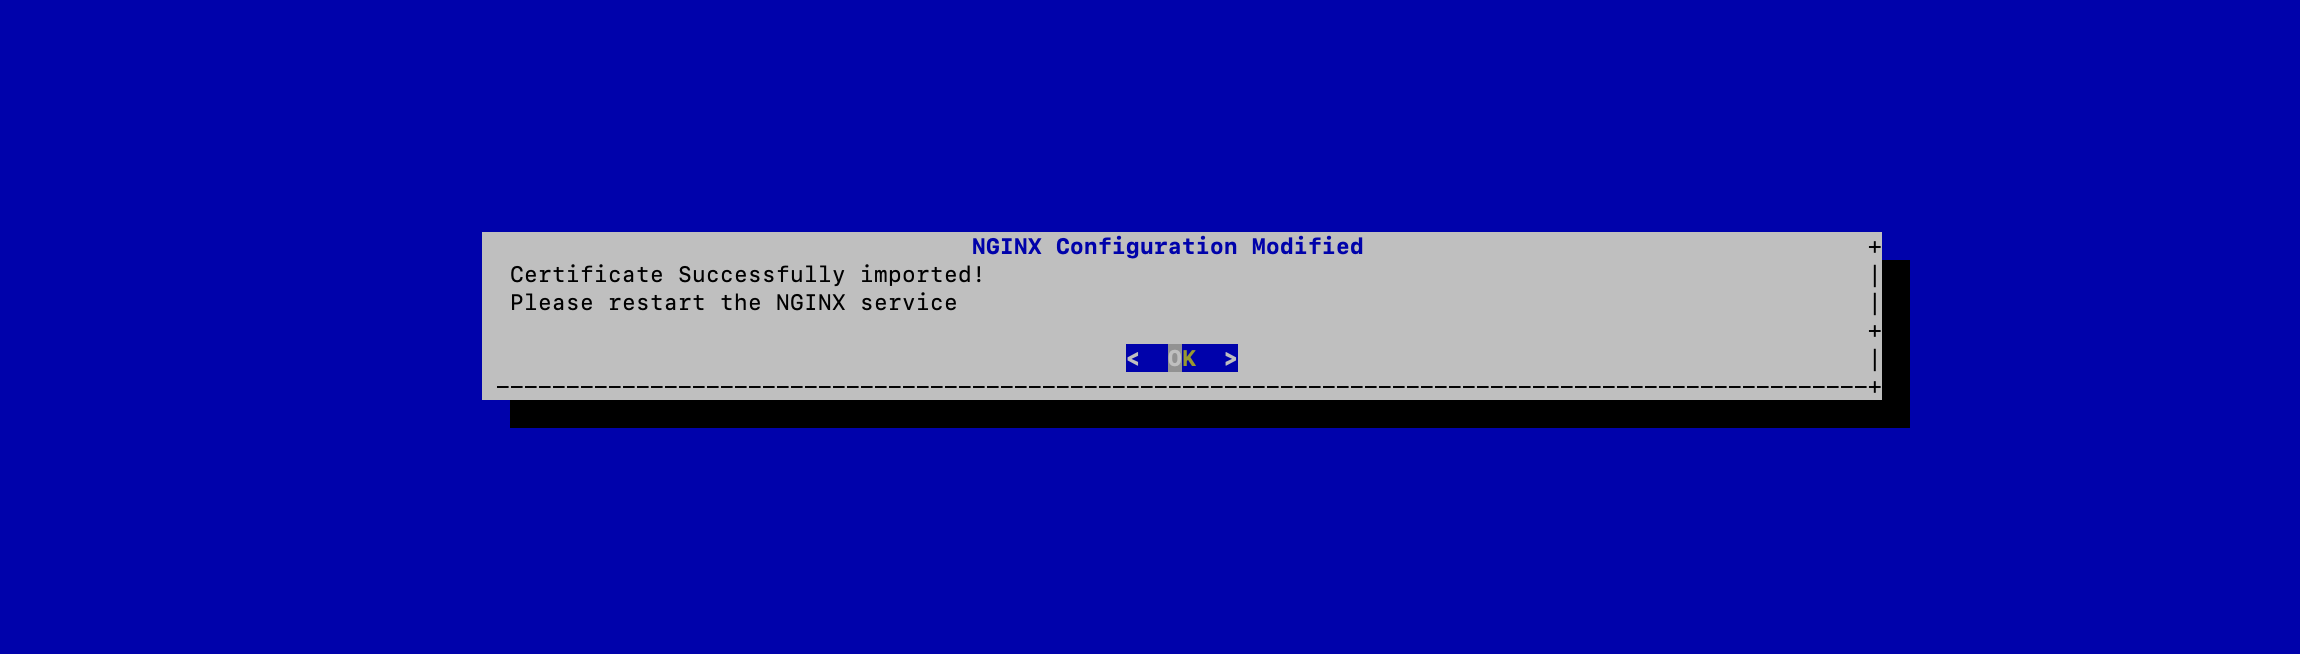
Upload the signed server certificate (in PEM format) on the Stream server under /tmp/stream.crt (using SCP or other means);
Connect to the server with an account with administrative privileges;
Start the Stream configuration utility by running:
# /opt/stream/sbin/stream-configIn the NGINX configuration menu, select 'CRT':

Specify the path /tmp/stream.crt and validate:

The server certificate is successfully installed:
Installing the Server Certificate Trust Chain
|
You must follow this section only if you signed the server certificate with an existing PKI. If you self-signed the server certificate, you do not need to follow this step. |
Upload the server certificate trust chain (the concatenation of the Certificate Authority certificates in PEM format) on the Stream server under /tmp/stream.bundle (using SCP or other means);
| The bundle should contain only the Certificate Authority certificates in PEM format and NOT the server certificate |
Connect to the server with an account with administrative privileges;
Start the Stream configuration utility by running:
# /opt/stream/sbin/stream-configIn the NGINX configuration menu, select 'TC':

Specify the path /tmp/stream.bundle and validate:

The server bundle is successfully installed:

Verify the NGINX configuration with the following command:
# nginx -tRestart the NGINX service with the following command:
# systemctl restart nginxConfiguring administrator certificate authentication
To authenticate as administrator on stream using a certificate, it is possible to either use a certificate generated on Stream, or to use an external certificate.
Issuing a Certificate Request (PKCS#10)
Generating the CSR on Windows
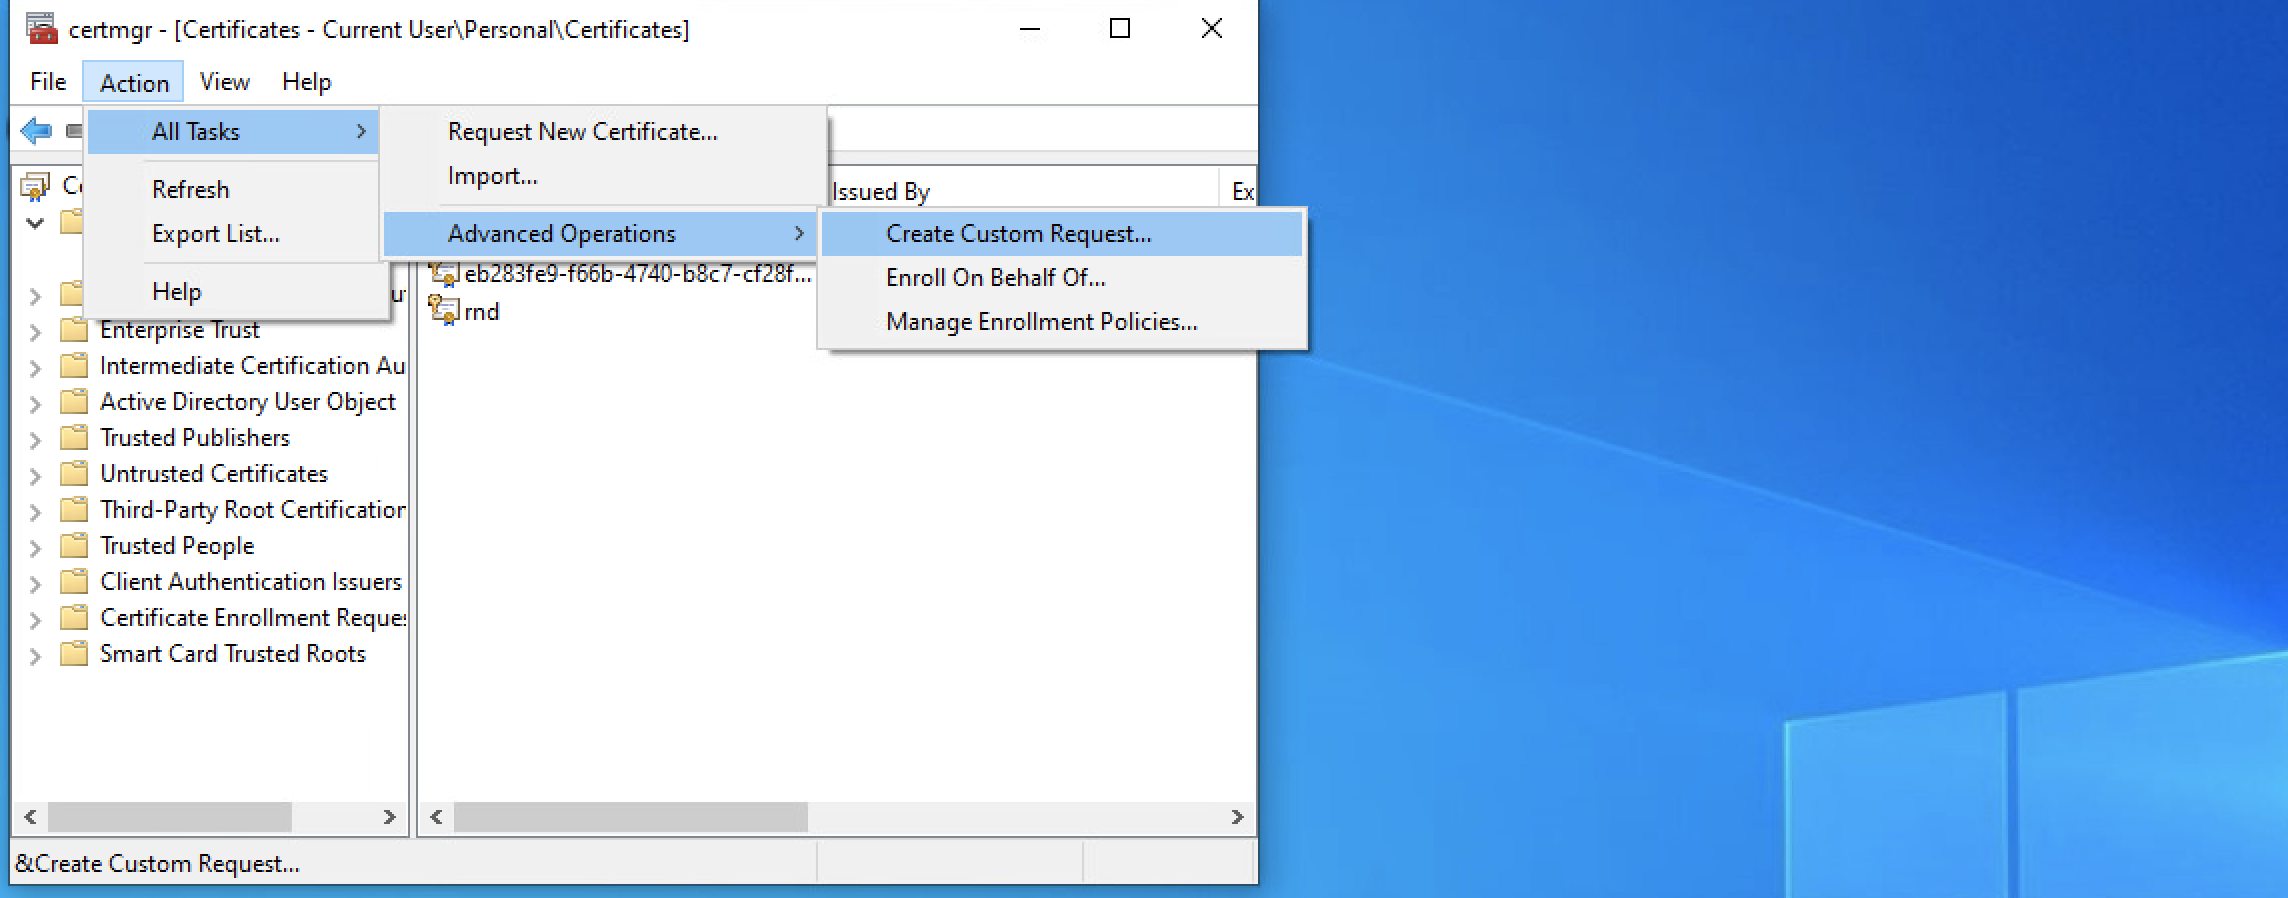
1. Press 'Windows Key + R' then type 'certmgr.msc' and press enter;
2. Expand 'Personal' then double click 'Certificates';
3. In the top bar, click 'Action > All Tasks > Advanced Operations > Create custom requests':
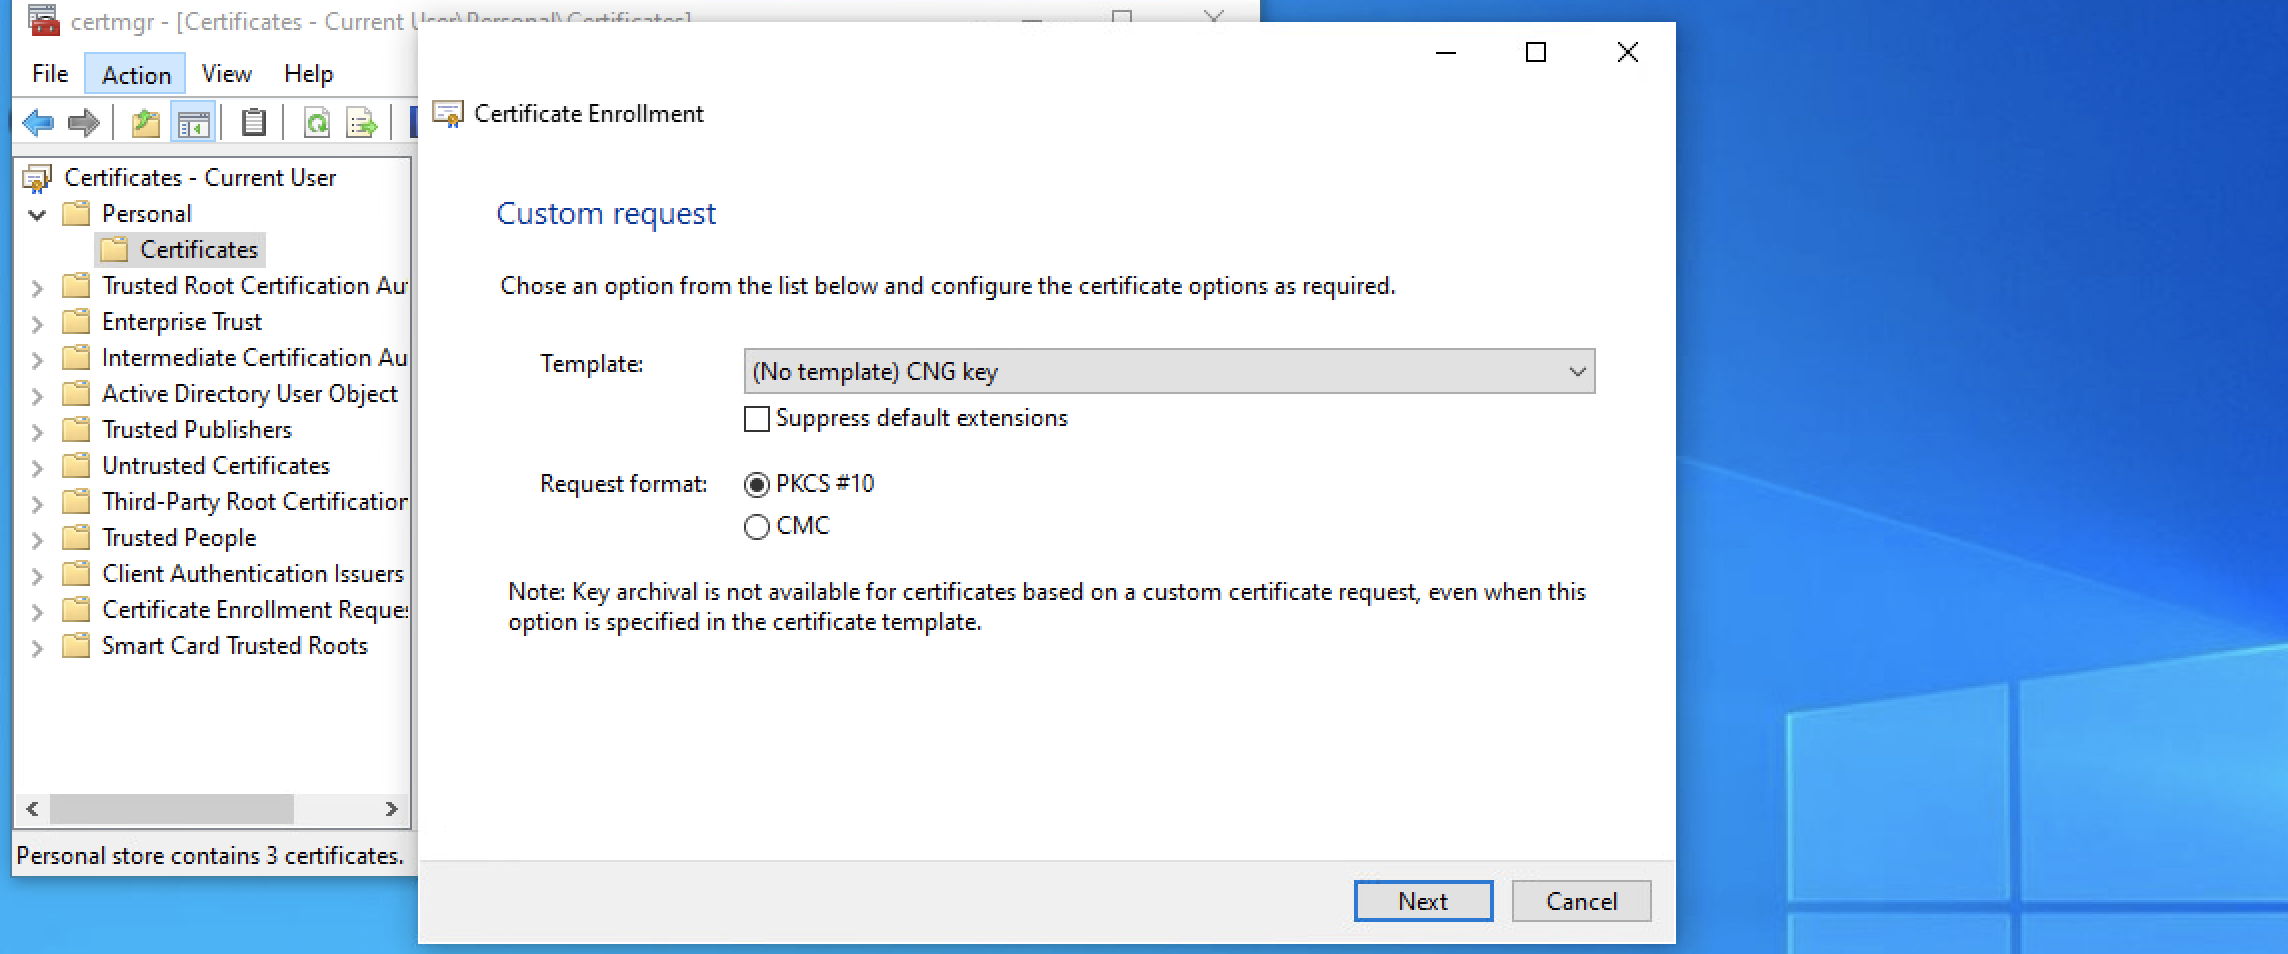
4. On the 'Before You Begin' and the 'Select Certificate Enrollment Policy' screens, click 'Next';
5. In the 'Custom request' window, select 'CNG Key' in the template drop-down menu and 'PKCS#10' as the request format, then click 'Next':
6. In the 'Certificate Information' window, click 'Details' then 'Properties':
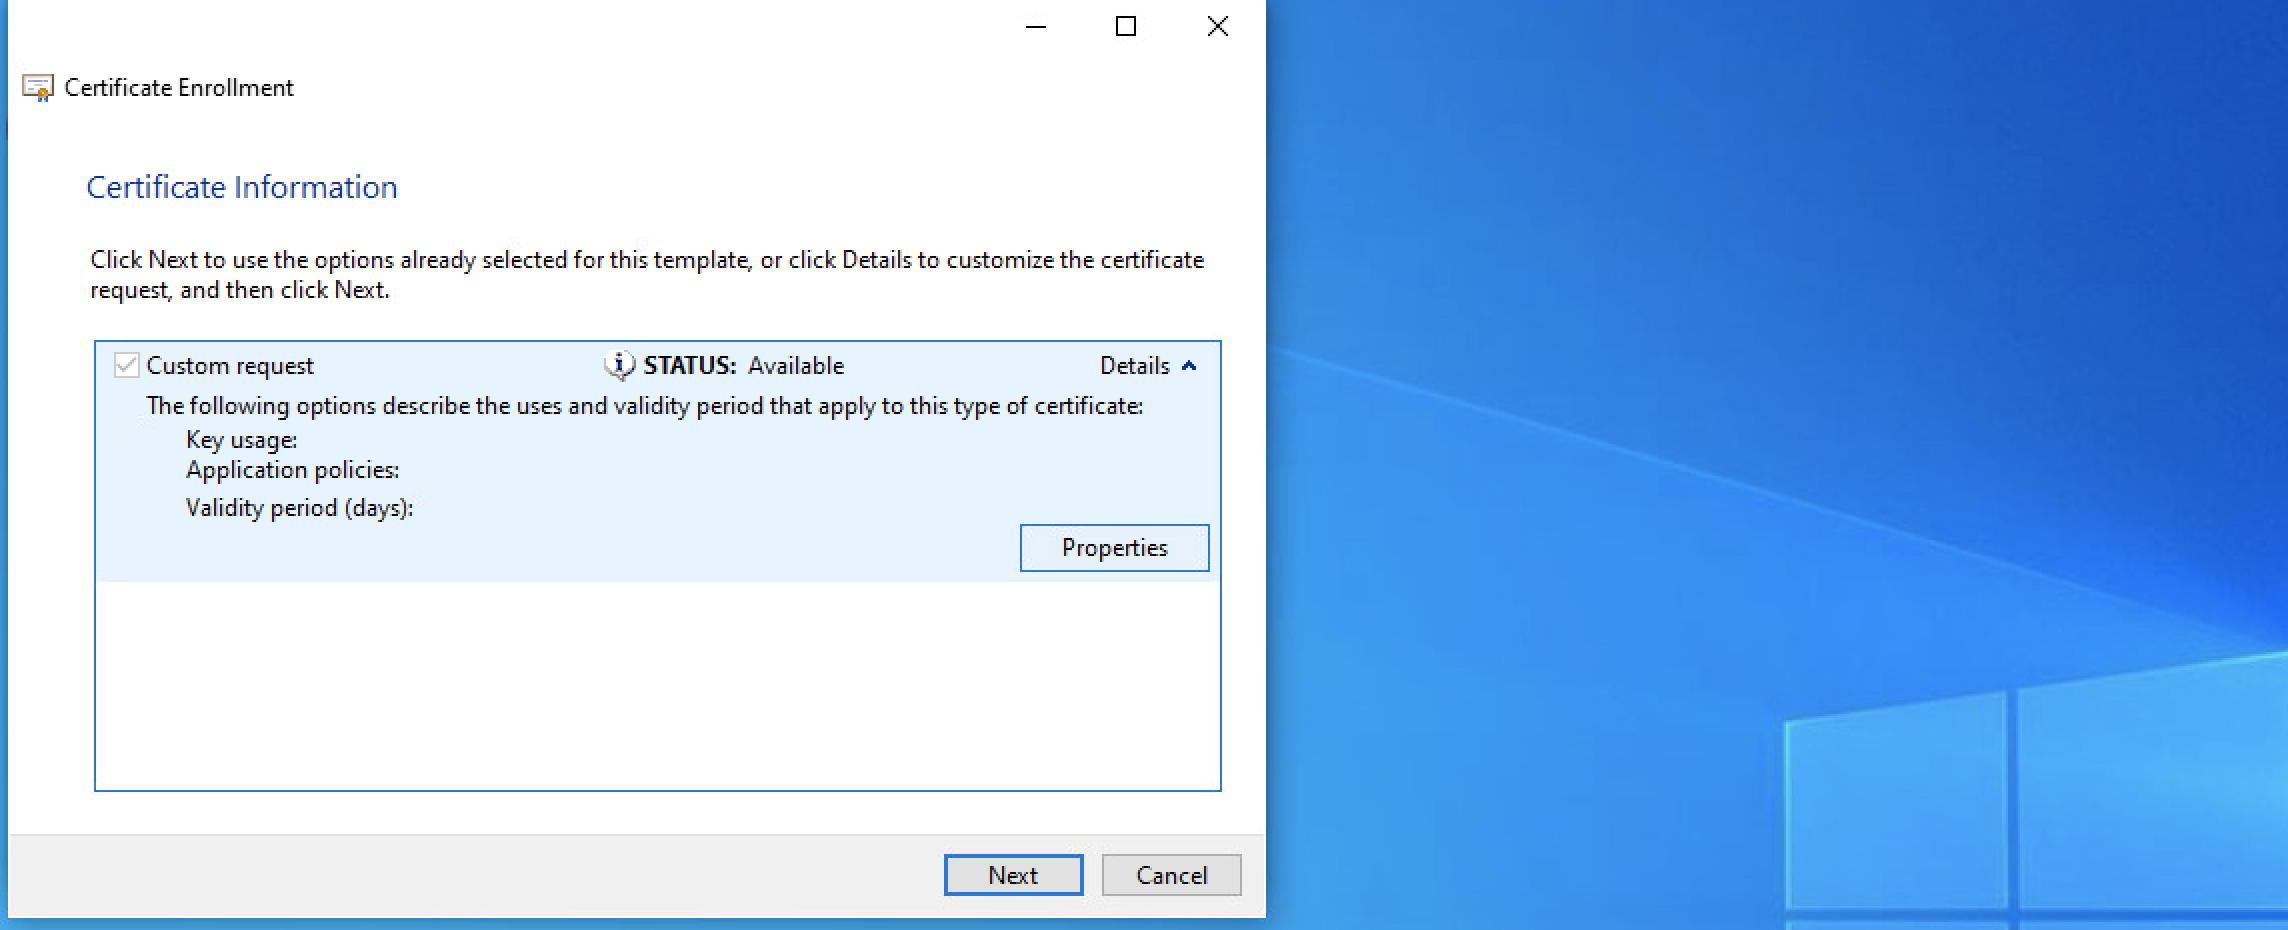
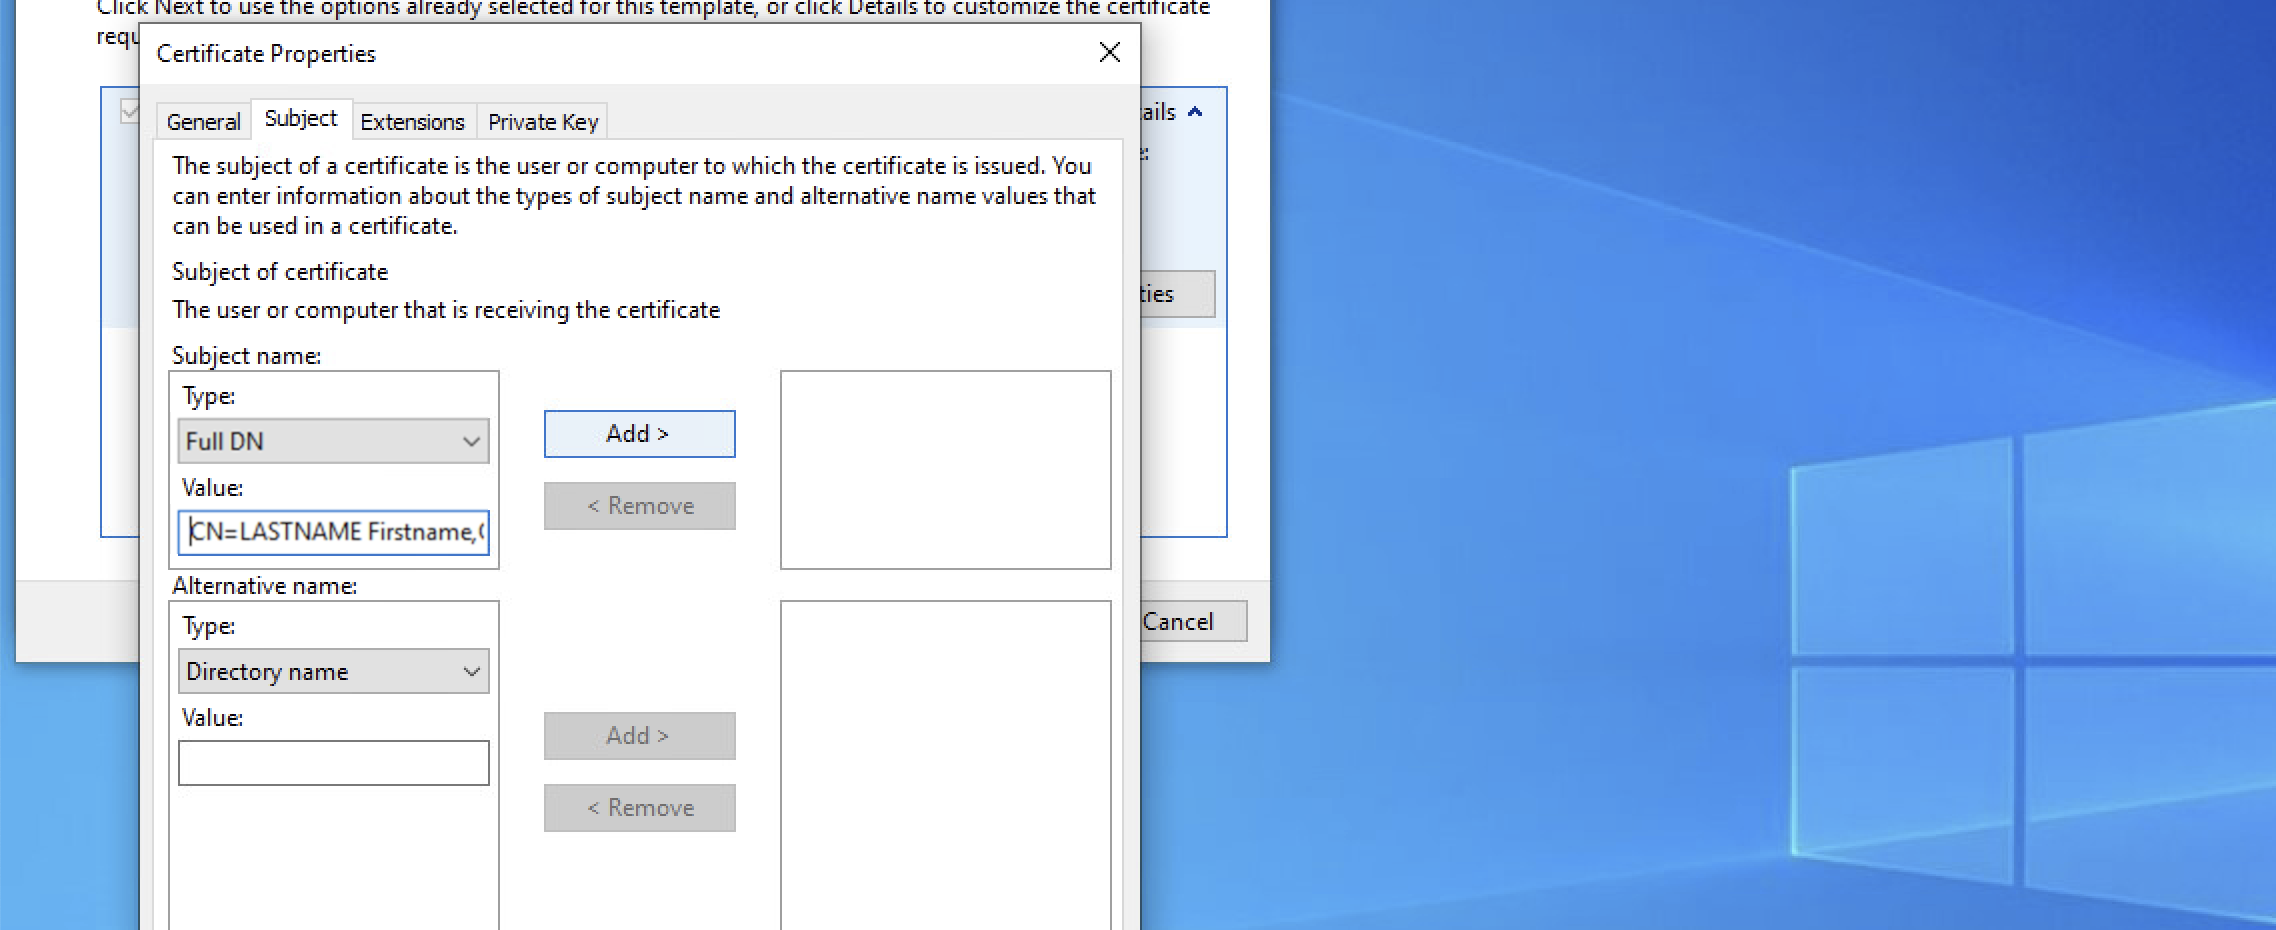
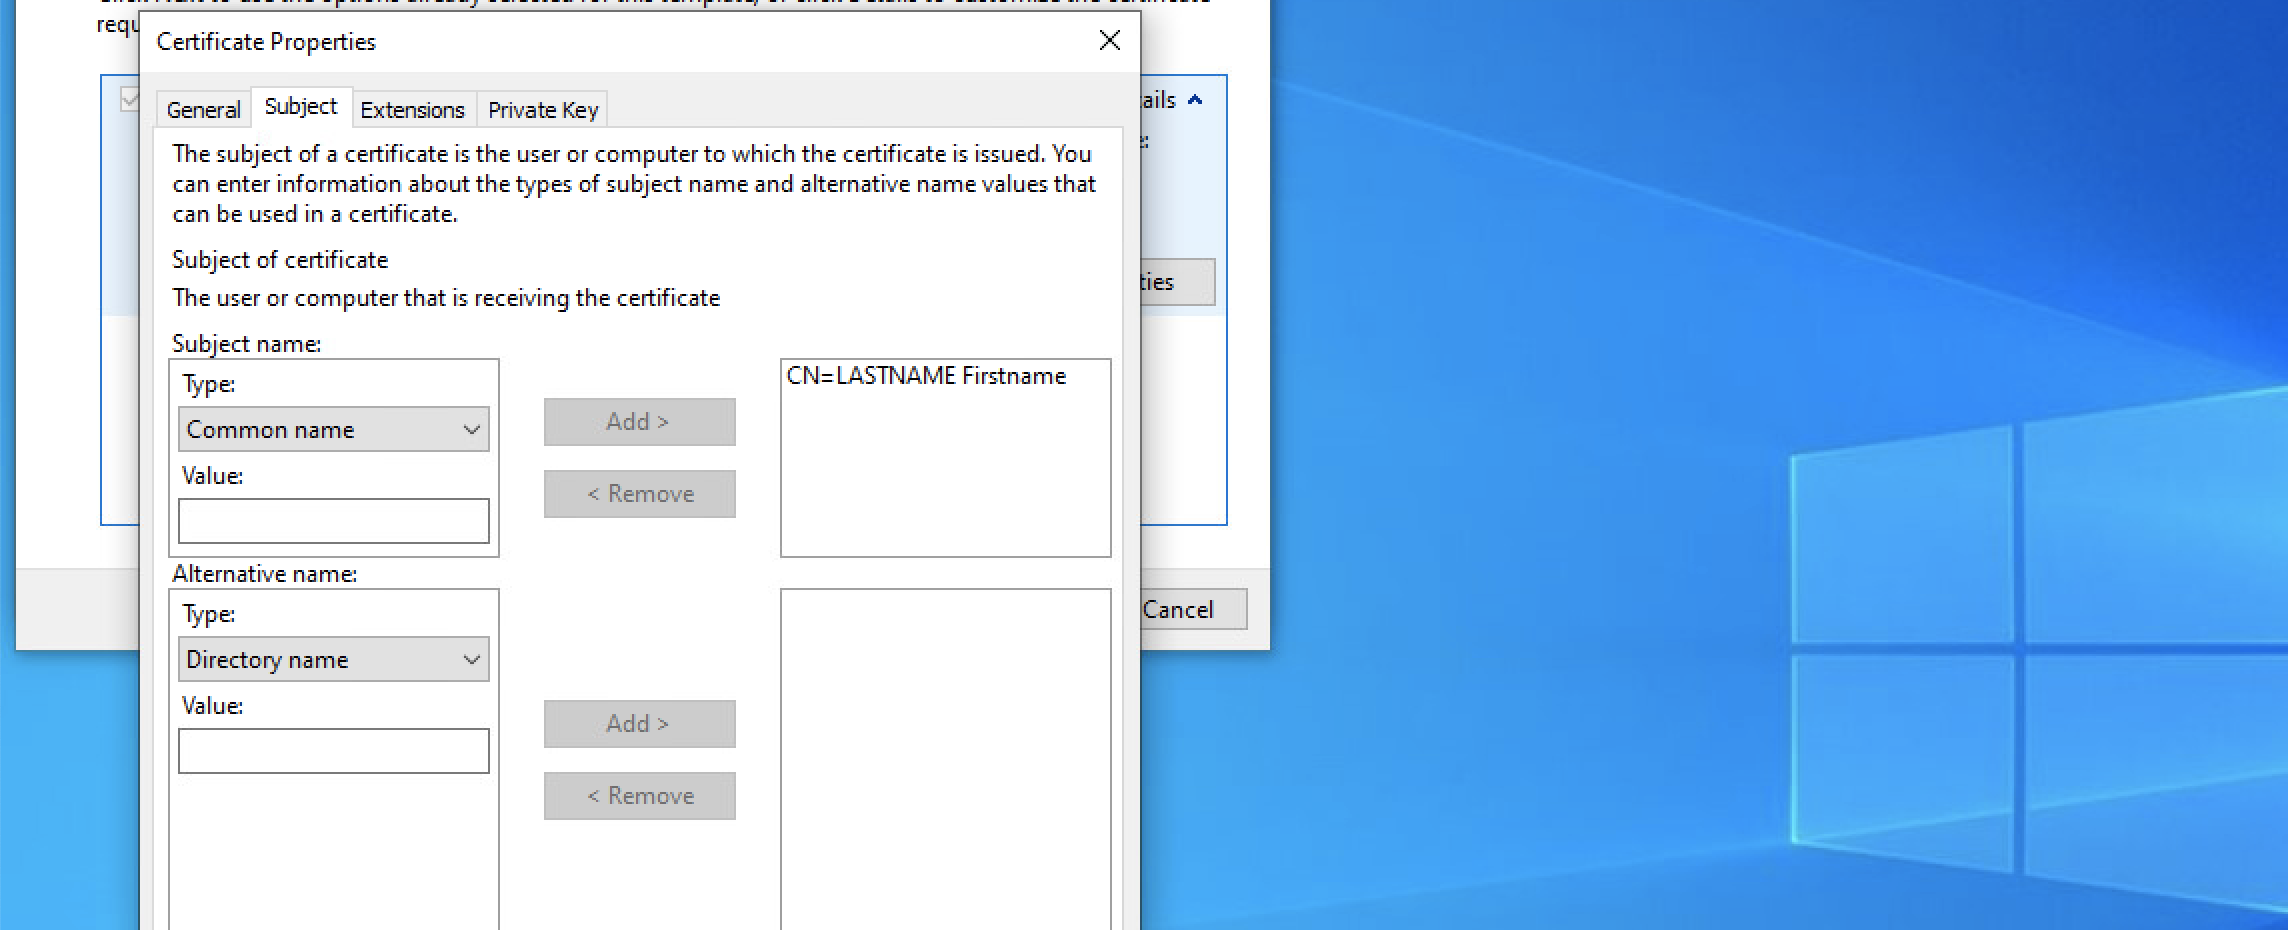
7. In the 'Certificate Properties' pop-up that opened:
-
General tab: Leave everything as default
-
Subject tab: In the subject name category enter the DN using the standard DN format then click Add:
| It is recommended for a certificate DN to contain at least a CN, OU, O and C element |
-
Extensions tab: Leave everything as default
-
Private Key tab: Expand 'Key options' and select '2048' for the key size, then expand 'Select Hash Algorithm' and select 'sha256' for the hash algorithm:
Click apply, then OK, then Next;
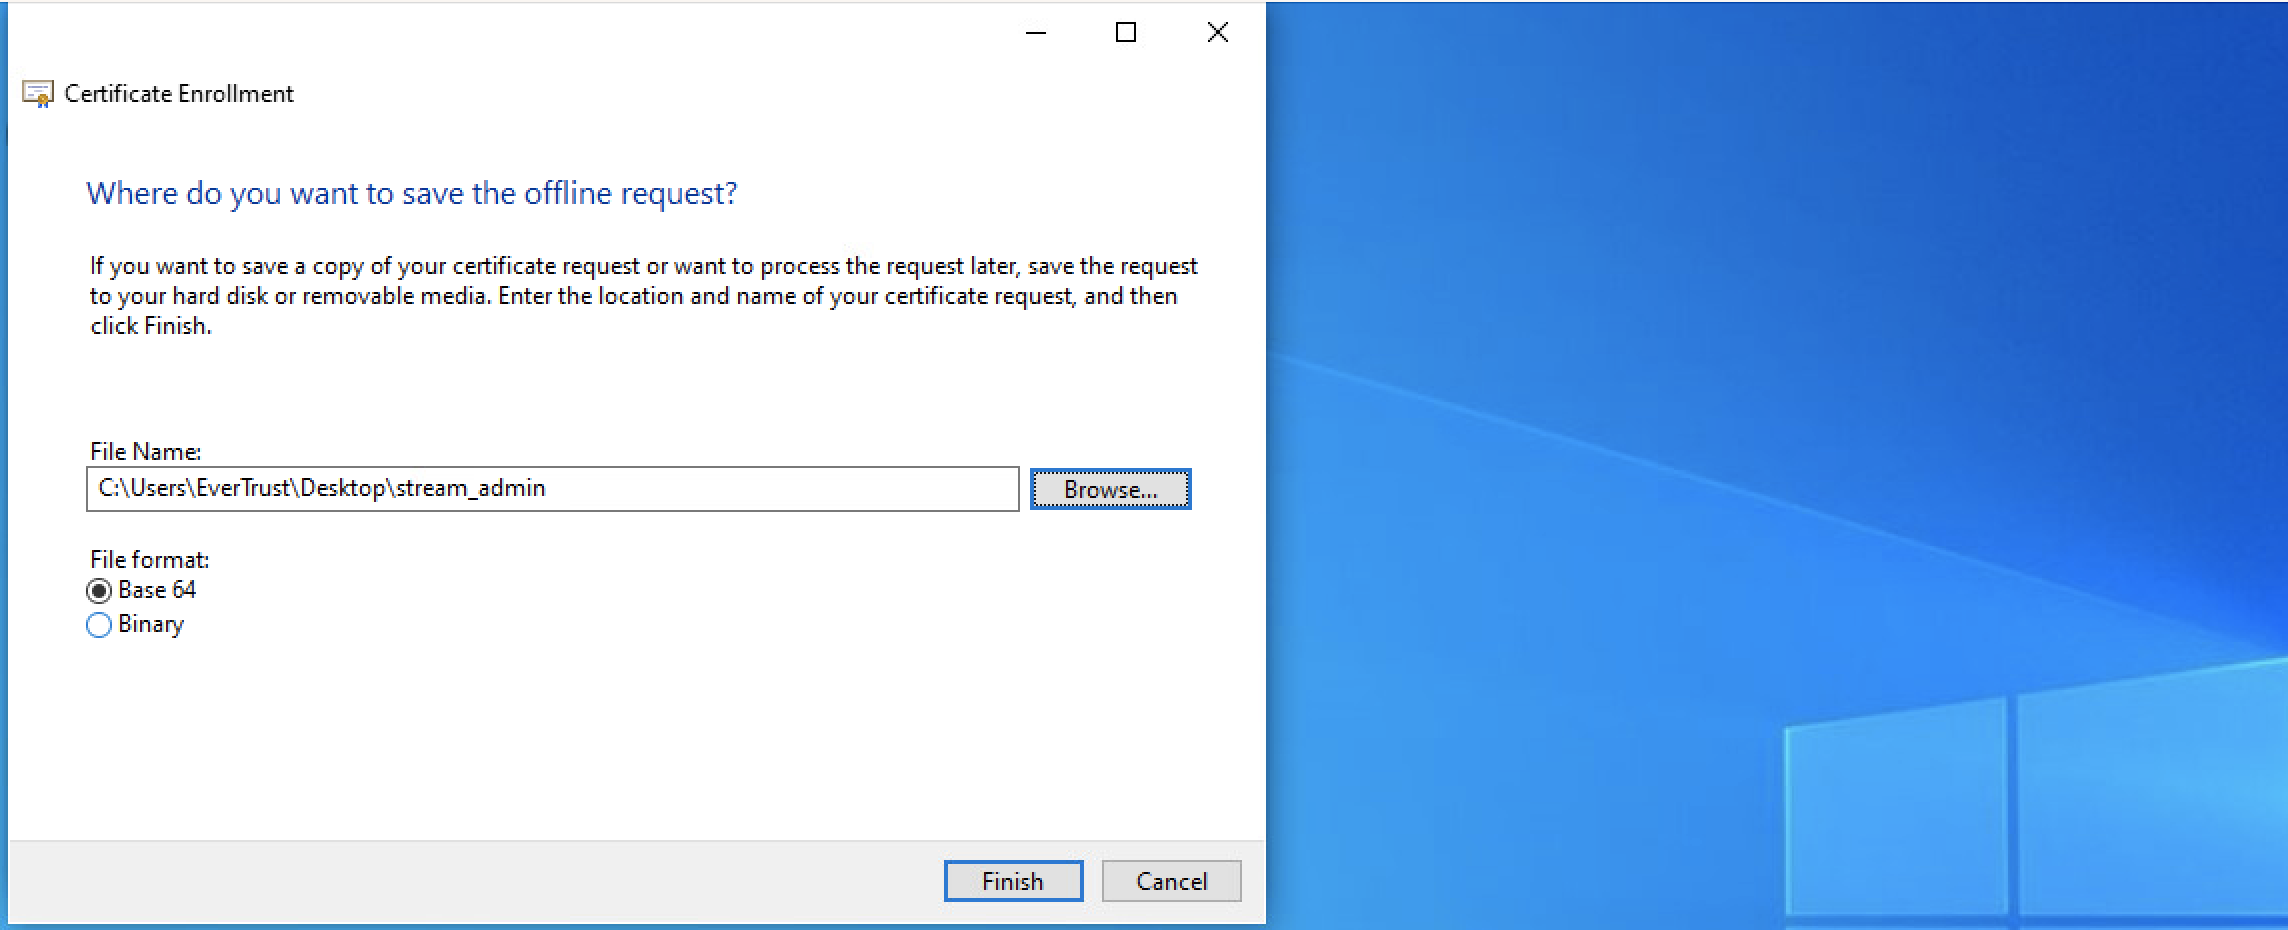
8. In the next window, select a place to save the CSR and select 'Base64' as File format, then click 'Finish':
Generating the CSR on Linux/MacOS
1. Start a shell instance;
2. Run the following command, replacing the DN with your information:
$ openssl req -new -newkey rsa:2048 -subj "/CN=LASTNAME Firstname/C=FR/OU=.../" -keyout ./stream_admin.key -out ./stream_admin.csrThis command will prompt you for a password to encrypt the CSR private Key
| It is recommended for a certificate DN to contain at least a CN, OU, O and C element |
Signing the certificate
Using a Stream-signed certificate
| This step assumes that the Key Ceremony already happened, i.e the operational CAs are imported into Stream as managed CAs. |
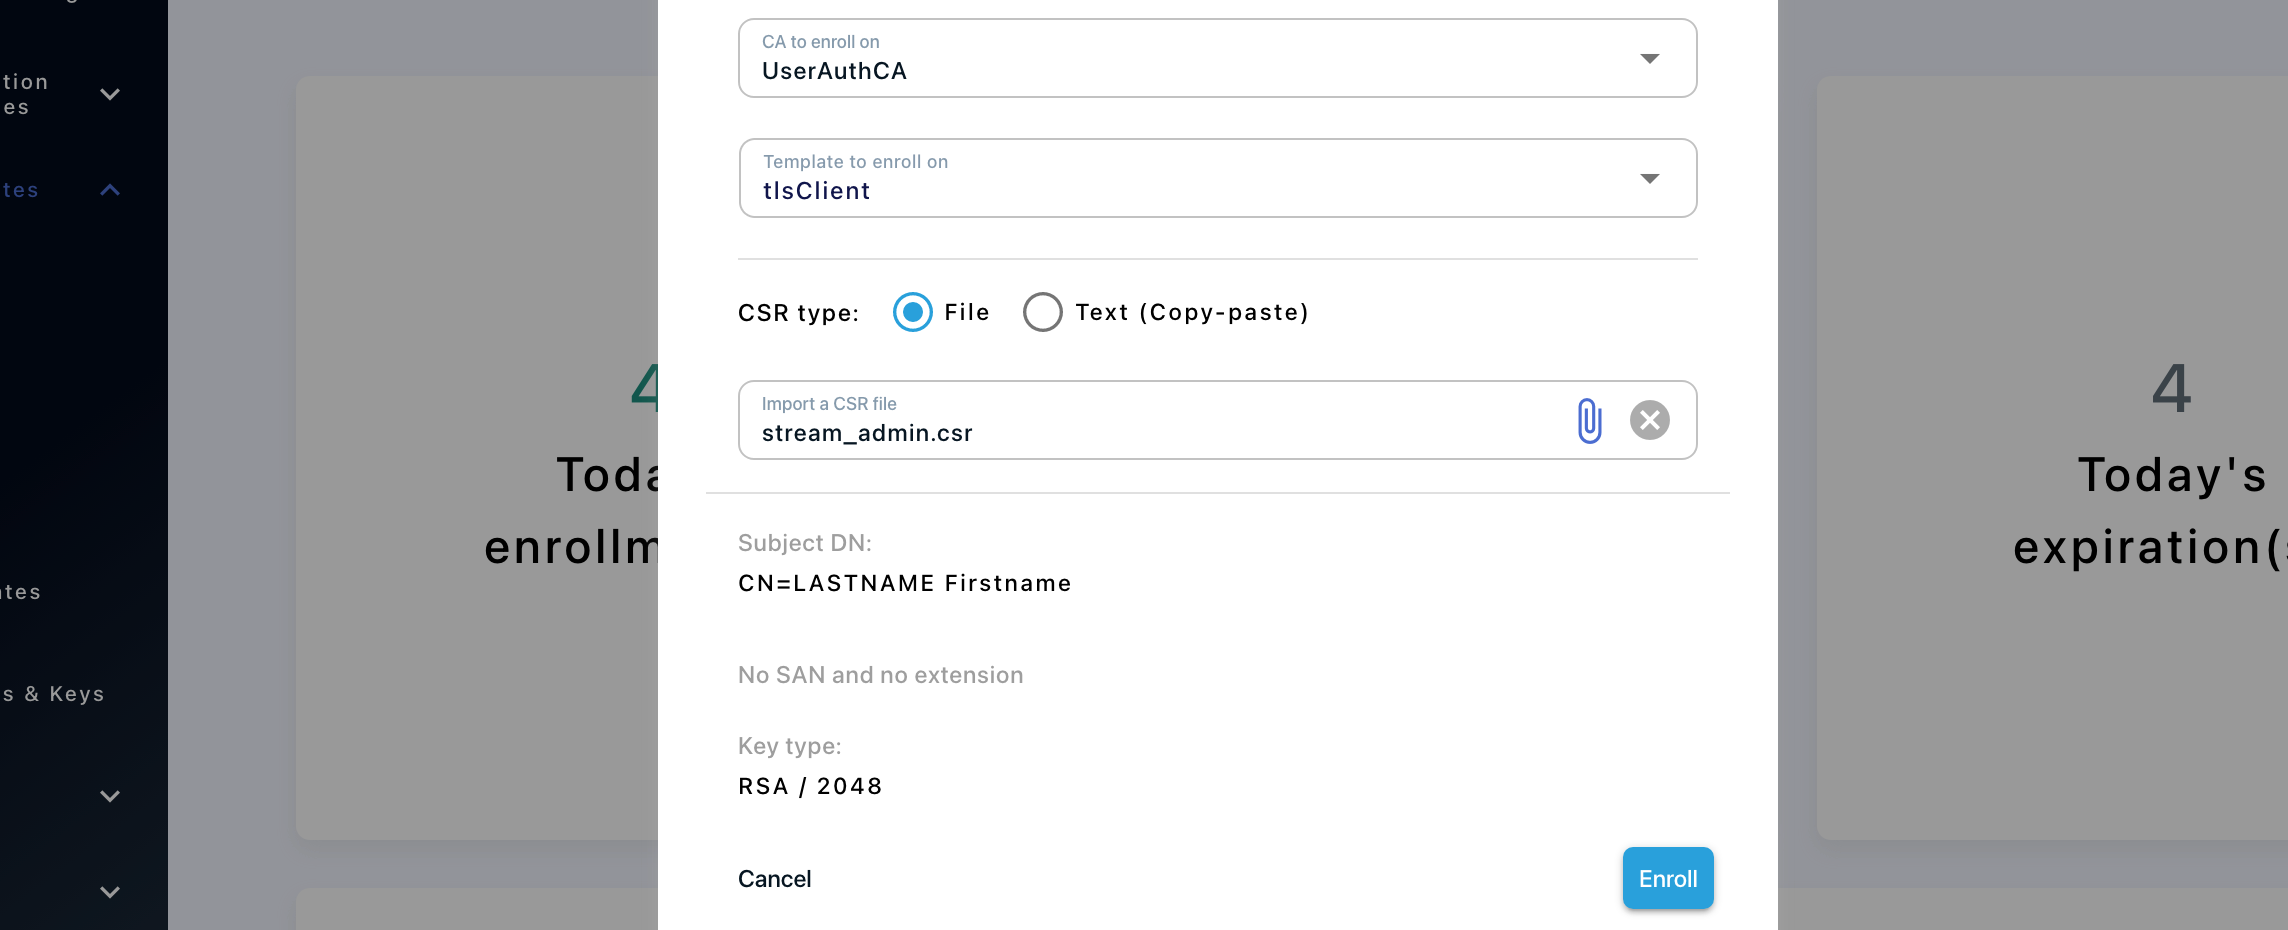
1. Access Stream’s web administration console and log in using the default administration credentials that were obtained at this section;
2. Browse to 'Certificates > Enroll';
3. Fill in the following information:
-
CA to enroll on: Select the CA that is issuing the user certificates for your organization. Note that it must have the 'Is trusted for client authentication' switch turned on in the interface;
-
Template to enroll on: Select the certificate template that was created at this step that should be named 'tlsClient';
-
CSR type: Select 'File', then click the paper clip icon and import the CSR that was generated at this step;
Then click 'Enroll':
You can retrieve the enrolled certificate in PEM format from the 'Certificates > Search' : download this certificate in PEM
Trusting the issuing CA for client authentication
In order for the client authentication certificate to work as intended, the issuing CA must be trusted for client authentication on Stream.
-
If your certificate was signed by a Stream managed CA:
Browse to , select your Issuing CA and toggle on 'Is trusted for client authentication' -
If your certificate was signed by an external CA:
If your CA is not yet imported, import it using the administration guide steps in .
Browse to , select your Issuing CA and toggle on 'Is trusted for client authentication'
Creating the SuperAdmin role in Stream
At this point, you should be logged into the Stream web administration console with the default administrator account.
1. Go to Security > Roles and click  ;
;
2. Fill-in the following information:
-
Name: SuperAdmin;
-
Description : Super administrator role that has all rights on Stream. Use with caution;
-
Configuration permissions : Click the '+' button then click on 'Section' and select 'All permissions of all type' and click the 'Add' button;
-
Lifecycle permissions : Click the '+' button, then :
-
Click on 'CA' and select 'All';
-
Click on 'Template' and select 'All';
-
Click on 'Rights' and select 'All';
-
Click the 'Add' button.
-
3. Click the 'Save' button at the top of the page.
The SuperAdmin role is now created.
Giving the SuperAdministrator role to the certificate
1. Access Stream’s web administration console and log in using the default administration credentials that were obtained at this section;
2. Browse to 'Security > Accounts' then click ;
3. Select 'X509' as an Account type and click the certificate icon on the right of the identifier box to load the PEM of the previously enroled certificate;
4. Click the 'Add role' button and select the 'SuperAdmin' role from the drop down menu;
5. Click the save button at the top of the page
Now the PEM certificate has the SuperAdmin permission in Stream.
Creating a PKCS#12 file from the private key and the PEM
This step can only be done using OpenSSL.
1. Connect to the server with an account with administrative privileges;
2. Upload the PEM of the certificate you used to create the SuperAdmin user at the previous step in the same folder where the private key that was used to generate the CSR was created in;
3. Run the following command:
$ openssl pkcs12 -export -inkey ./stream_admin.key -in ./stream_admin.pem -name StreamAdministrator -out ./stream_admin.p12This will create a PKCS#12 file containing the PEM of the certificate and its private key in PKCS#8 format (encrypted). The previous utility will first ask the private key file pass phrase and then ask for a passphrase to protect the PKCS#12.
|
If using an openssl version greater than 3, you will need to add |
4. Import this .p12 file into your certificate store or the certificate store of your browser if it has one (ex: Firefox). At the import, you should be prompted to enter the passphrase that you used to encrypt the PKCS#12.
Now you should have the certificate imported and ready to be used.
When going to the Stream web interface while not being logged in, your web browser should prompt you for a certificate to use and you should be able to select the one that you imported just now.
Removing the administrator local account
| Before deleting the account, ensure that your administrator certificate is working as intended. |
1. Access Stream’s web administration console and log in using the client certificate that was set-up at the previous step;
2. Browse to 'Security > Accounts';
3. Click the bin icon next to the 'administrator' account and confirm deletion.
| After reviewing the Security Guidelines, Stream is ready to leave its confined environment. |